How To Add an Instagram Widget in a Blogger Blog
If you're not familiar with Instagram, it's a photo-sharing network that you can download as an app on your smartphone. Think of it like Facebook without status updates. By developing a simple service that does one thing and does it well, Instagram has become the most popular photo sharing app on the market.
The great thing about using Instagram is that it's not just for individuals. Businesses and nonprofits can use this service to share their day and their passion with their loyal customers and fans. These fans have about 200 million monthly active users and about 7.3 million new posts per day. That's a staggering amount of potential new customers you can bring in.
 By adding Instagram to Blogger as a widget, you will open up a new visual side to your website and allow visitors to go beyond the words on the page. With the easy portability of the application to your smartphone wherever you go, you can take photos, apply filters and upload this content to your profile. Blogger's special tool for Instagram will retrieve this data from your profile and display the images on your website. Even non-Instagram members can use this service.

It doesn't matter what you share. Whether you're the type of person who likes to share photos of your dinner party with the world, or a business owner who likes to showcase their brand in their everyday life, Instagram might be for you. Adding Instagram to Blogger as a widget provides a very accessible tool for using stock photos in new posts.
This guide explains how to add an Instagram widget to your site with step by step instructions. The design of your new Instagram widget is fully customizable and allows you to change the background color, font and the way the widget is displayed on the site. When you're done, you'll find that the Instagram widget blends in seamlessly with your existing theme and makes your blogger site stand out from the rest.
2. Enter your username > select Network or Slideshow:

3. Set the thumbnail size (default 100px) and choose if you want to have a border around your image.

4. To change the background color, click the blank box and select the desired color

5. Select "Yes" if you want the widget to display a "Share" button, otherwise click "No".
6. If the tool satisfies you, click the "Get Code" button and copy your code.

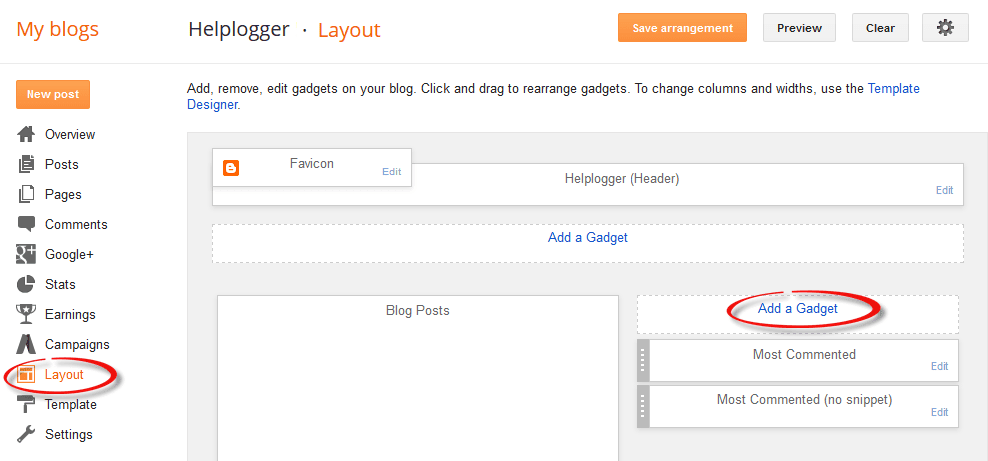
7. Log in to your Blogger account and select your blog > go to the Layout section and click the Add Widget link on the left:

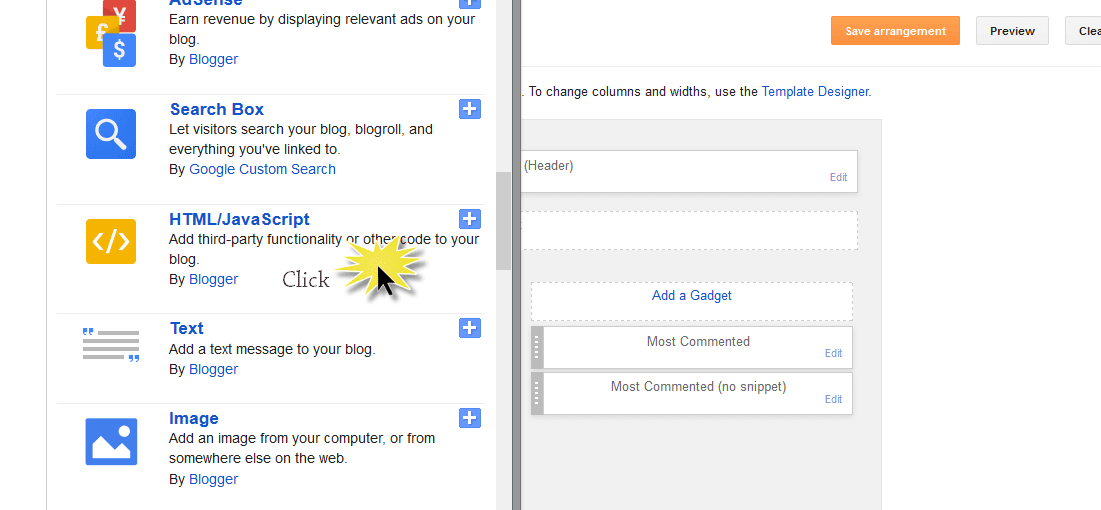
8. In the pop-up window, scroll down and click the "HTML/JavaScript" widget:

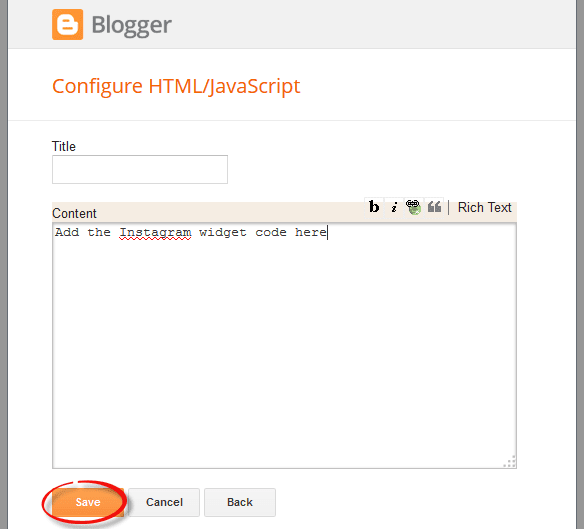
9. Paste the code obtained from the Intagme website into the content section and click the "Save" button to save the widget.

10. If you want to change the position of the widget, click, drag and click the "Save position" button in the upper right corner.

Just that! Now you have your very own Instagram Blogger Blog Widget so you can share new photos with your viewers and get a peek into your life while away from your computer. In order to change or add a photo displayed on the widget, you must go directly through the application or log into your account via the Instagram website.
When you're ready to show off your new masterpiece, post a Facebook link on your site to all of your clients or fans, or tweet your changes so they can follow you. Don't forget to include some photos before the ad so they have something to look at. As soon as they enter your gadget, they can enjoy your new photos and interact with you in a whole new way.
The great thing about using Instagram is that it's not just for individuals. Businesses and nonprofits can use this service to share their day and their passion with their loyal customers and fans. These fans have about 200 million monthly active users and about 7.3 million new posts per day. That's a staggering amount of potential new customers you can bring in.


It doesn't matter what you share. Whether you're the type of person who likes to share photos of your dinner party with the world, or a business owner who likes to showcase their brand in their everyday life, Instagram might be for you. Adding Instagram to Blogger as a widget provides a very accessible tool for using stock photos in new posts.
This guide explains how to add an Instagram widget to your site with step by step instructions. The design of your new Instagram widget is fully customizable and allows you to change the background color, font and the way the widget is displayed on the site. When you're done, you'll find that the Instagram widget blends in seamlessly with your existing theme and makes your blogger site stand out from the rest.
How to Add Instagram Widgets to Blogger
1. To get the Instagram widget, visit the Intagme website at: http://www.intagme.com/2. Enter your username > select Network or Slideshow:

3. Set the thumbnail size (default 100px) and choose if you want to have a border around your image.

4. To change the background color, click the blank box and select the desired color

5. Select "Yes" if you want the widget to display a "Share" button, otherwise click "No".
6. If the tool satisfies you, click the "Get Code" button and copy your code.

7. Log in to your Blogger account and select your blog > go to the Layout section and click the Add Widget link on the left:

8. In the pop-up window, scroll down and click the "HTML/JavaScript" widget:

9. Paste the code obtained from the Intagme website into the content section and click the "Save" button to save the widget.

10. If you want to change the position of the widget, click, drag and click the "Save position" button in the upper right corner.

Just that! Now you have your very own Instagram Blogger Blog Widget so you can share new photos with your viewers and get a peek into your life while away from your computer. In order to change or add a photo displayed on the widget, you must go directly through the application or log into your account via the Instagram website.
When you're ready to show off your new masterpiece, post a Facebook link on your site to all of your clients or fans, or tweet your changes so they can follow you. Don't forget to include some photos before the ad so they have something to look at. As soon as they enter your gadget, they can enjoy your new photos and interact with you in a whole new way.
Post a Comment for "How To Add an Instagram Widget in a Blogger Blog"