How to add a thumbnail image/photo gallery in Blogger
For those who want to display images in a gallery, here's a nice gallery made with JavaScript and CSS. This gallery displays available thumbnails vertically or horizontally above the selected photo, making it easy to select different images with a simple mouse click.
With CSS we can![]() to display the element in the same position as the rest of the thumbnails and to style the thumbnails as small blocks with the specified height and width. The script will add a click event for each
to display the element in the same position as the rest of the thumbnails and to style the thumbnails as small blocks with the specified height and width. The script will add a click event for each object that modifies the child![]() set it to visibility and a class name of 'active'.
set it to visibility and a class name of 'active'. .
Related: Image Slider Effect Using Only CSS

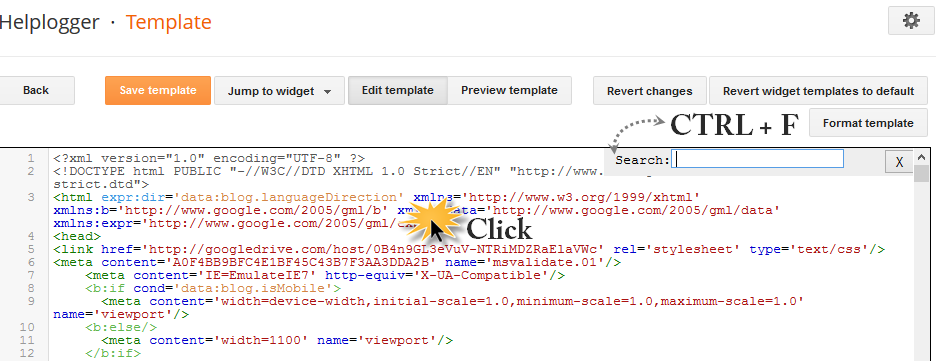
Step 2: Click anywhere in the code field and press CTRL+F to open the search field.
Step 3: Type this tag in the search box and press Enter to find it.
Step 4: Now select one of the styles below and copy the code below:

 Note: Display: because the first id ( #image-gallery ) is to prevent images from being displayed at their actual size before they are placed in the gallery container.
In #jquery-gallery we have the width of the thumbnail container (200px) to display it in two lines, and for that we need to calculate the width of the thumbnail (80px) plus the margins in between.
The left #jquery-gallery li img expression should move the larger clickable thumbnail to overlap the smaller thumbnail.
Step 5: Place it on the selected style code label
Step 6: Now in the same thing tag add this script.
Basically, this script looks for an ID called " Gallery " and retrieves the various list items that might be there. These items will be displayed as thumbnails and the function will decide what to do when clicked. So when we click on the thumbnail, it is assigned the " active " class and the thumbnail should be visible in a larger container.
Step 7: Finally, save your changes by clicking the Save Template button.
Here's the HTML that displays a neat list with the ImageGallery ID wrapped in a relative position DIV to avoid side effects from other pre-existing positions.
Step 8: Paste the HTML code below where you want to display the gallery, either by going to Layout and adding a new widget (click the Add Widget link and select the HTML/JavaScript option) or inside. message/page in the HTML section.
For example:
With CSS we can
Related: Image Slider Effect Using Only CSS
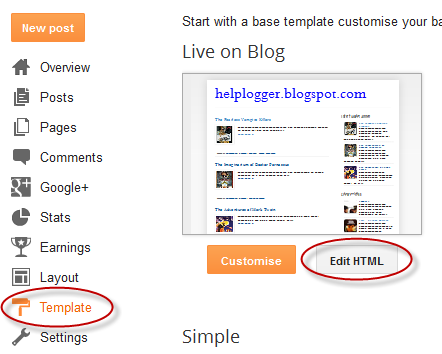
How to Add Gallery to Blogger
Step 1: Log in to your Blogger account , select your blog and go to the Template section, click the Edit HTML button.Step 2: Click anywhere in the code field and press CTRL+F to open the search field.
Step 3: Type this tag in the search box and press Enter to find it.
Step 4: Now select one of the styles below and copy the code below:
In #jquery-gallery we have the width of the thumbnail container (200px) to display it in two lines, and for that we need to calculate the width of the thumbnail (80px) plus the margins in between.
The left #jquery-gallery li img expression should move the larger clickable thumbnail to overlap the smaller thumbnail.
Step 5: Place it on the selected style code label
Step 6: Now in the same thing tag add this script.
Basically, this script looks for an ID called " Gallery " and retrieves the various list items that might be there. These items will be displayed as thumbnails and the function will decide what to do when clicked. So when we click on the thumbnail, it is assigned the " active " class and the thumbnail should be visible in a larger container.
Step 7: Finally, save your changes by clicking the Save Template button.
Here's the HTML that displays a neat list with the ImageGallery ID wrapped in a relative position DIV to avoid side effects from other pre-existing positions.
Step 8: Paste the HTML code below where you want to display the gallery, either by going to Layout and adding a new widget (click the Add Widget link and select the HTML/JavaScript option) or inside. message/page in the HTML section.
Note: If your page elements overlap this gallery, you'll need to add the 'position. relative' phrase on the pitch . then the Height value depends on the size of your gallery.
IMAGE-URL1 " />:
For example:
Replace IMAGE-URL1 with the image URL. If you don't know how to get an image URL, check out this tutorial: How to upload images and get URLs.
If you need to compress images, add the following HTML structure instead:Again, here you need to replace the Page URL text with your page/post URL.
- Page URL ">:
- Page URL ">:
- Page URL ">:
- Page URL ">:
- Page URL ">:
Update: To add captions, enter the orange lines and replace "Captions" with the text you want to appear on each image:
- Page URL ">:
alt="Caption" src=" IMAGE-URL1 " />
- Page URL ">:
alt="Caption" src=" IMAGE-URL2 " />
- Page URL ">:
alt="Caption" src=" IMAGE-URL3 " />
- Page URL ">:
alt="Caption" src=" IMAGE-URL4 " />
- Page URL ">:
alt="Caption" src=" IMAGE-URL5 " />
Save the widget or publish your page and you're done adding thumbnails/photo galleries to Blogger.
Post a Comment for "How to add a thumbnail image/photo gallery in Blogger"